


Data analytics and business intelligence have grown to be key considerations for most businesses in today's market. Organizations are now investing more in their data technologies, and there's an increasing focus on being data-driven. Unsurprisingly, Snowflake has emerged as a first-choice data warehousing technology solution for many, greatly enhancing the development experience when working on SQL-heavy tasks. 🏆
Although working with SQL on Snowflake is largely similar to working with any other SQL platform, there are some cases where the Snowflake environment differs from the rest. One such case is running into a missing column specification error, which arises due to the distinctive way that Snowflake's query processing engine evaluates and parses SQL queries.
In this article, you'll take a closer look at this error to better understand what it is, how it arises, and how it can be resolved.
For starters, what’s a SQL compilation error?
Snowflake, like other database platforms, works with SQL and has implemented its own version of a SQL query engine. Although Snowflake largely follows the standard SQL syntax, it has a few modifications to the syntax and semantics when compared to databases such as Postgres or MySQL.
As such, queries submitted to Snowflake for execution are compiled and validated to ensure they conform to Snowflake's query syntax rules. Like any other language, SQL conforms to a set of lexical usage rules and semantics. So, when a query is submitted to the query processing engine, it undergoes a process called compilation, during which the SQL statements undergo syntax checks and semantic checks to ensure compliance with these rules.
✅ Syntax Checks ensure that keywords are spelled correctly, statements are terminated with delimiters, and there aren't any unsupported formats in the query.
✅ Semantic Checks ensure that the objects such as tables and columns used within the query are valid and available to the user.
Any syntax or semantic failure during the compilation process results in a compilation error.
What causes "missing column specification" errors in particular?
"Missing column specification" is a type of SQL compilation error, meaning that this error arises due to some incorrect syntax in the SQL query you're trying to process. 🛑 Specifically, the missing column specification error arises when you use Snowflake's data definition language (DDL) to create a table or create a view (materialized or not).
If you're creating a new table, view, or materialized view using a select column statement, the Snowflake DDL requires that all the referenced columns are explicitly named with aliases. Here’s how this plays out in practice. 👇
Resolving "missing column specification" errors
Before you can reproduce the error on Snowflake, you'll need to set up the SnowSQL client on your machine.
Setting up SnowSQL
Log in to your Snowflake account. If you don’t have a Snowflake account, you can create one here.
Follow the appropriate SnowSQL CLI installation guide for your system. After installing SnowSQL, execute the following command in the terminal to connect to your Snowflake account:
snowsql -a <account-identifier>.<aws-region>.aws -u <username>
On successful login, you should see the following:
* SnowSQL * v1.2.23
Type SQL statements or !help
<username>#(no warehouse)@(no database).(no schema)>
In a new terminal, clone the following GitHub repo:
git clone https://github.com/furqanshahid85-python/sf-resolve-missing-col-spec-error.git
The data files you'll be using in this tutorial can be found in the data_files folder in the repo, and the db.sql file contains the DDL for all the objects you need to create on Snowflake. From db.sql, execute the following commands in the SnowSQL terminal to create a warehouse, table, and schema in Snowflake:
-- DDL for creating warehouse
CREATE OR REPLACE WAREHOUSE DEV_WAREHOUSE1
WITH WAREHOUSE_SIZE ='XSMALL'
AUTO_SUSPEND = 60
AUTO_RESUME = TRUE
INITIALLY_SUSPENDED = TRUE
COMMENT = 'Warehouse for DEV purposes';
USE WAREHOUSE DEV_WAREHOUSE;
-- DDL for Database creation
CREATE DATABASE IF NOT EXISTS ANALYTICALDB;
USE DATABASE ANALYTICALDB;
-- DDL for schema
CREATE SCHEMA IF NOT EXISTS PUBLIC;
USE SCHEMA PUBLIC
-- DDL for tables
CREATE OR REPLACE TABLE ANALYTICALDB.PUBLIC.USERS (
USER_ID NUMBER(38,0),
JOINED_AT DATE,
COUNTRY_CODE VARCHAR(16777216)
);
CREATE OR REPLACE TABLE ANALYTICALDB.PUBLIC.BOOKINGS (
ID NUMBER(38,0),
STARTTIME DATE,
DURATION_HOURS NUMBER(38,0),
USER_ID NUMBER(38,0),
STATUS VARCHAR(16777216)
);
CREATE OR REPLACE TABLE ANALYTICALDB.PUBLIC.PAYMENTS (
ID NUMBER(38,0),
CREATED_AT DATE,
PAYMENT_AMOUNT FLOAT,
USER_ID NUMBER(38,0)
);
Your database objects are now created. Next, copy the data from the CSV files in the repo into the database tables. To do this, create Snowflake stage and file format objects.
Then run the following commands from db.sql:
-- DDL for copying csv files
CREATE OR REPLACE STAGE USERS_STAGE;
CREATE OR REPLACE FILE FORMAT USERS_FORMAT TYPE = 'CSV' FIELD_DELIMITER = ',';
PUT file:///tmp/data/Users.csv @USERS_STAGE;
CREATE OR REPLACE STAGE BOOKINGS_STAGE;
CREATE OR REPLACE FILE FORMAT BOOKINGS_FORMAT TYPE = 'CSV' FIELD_DELIMITER = ',';
PUT file:///tmp/data/Bookings.csv @BOOKINGS_STAGE;
CREATE OR REPLACE STAGE PAYMENTS_STAGE;
CREATE OR REPLACE FILE FORMAT PAYMENTS_FORMAT TYPE = 'CSV' FIELD_DELIMITER = ',';
PUT file:///tmp/data/Payments.csv @PAYMENTS_STAGE;
Next, run the following copy commands from db.sql to copy data into snowflake tables:
COPY INTO ANALYTICALDB.PUBLIC.USERS FROM @USERS_STAGE;
COPY INTO ANALYTICALDB.PUBLIC.BOOKINGS FROM @BOOKINGS_STAGE;
COPY INTO ANALYTICALDB.PUBLIC.PAYMENTS FROM @PAYMENTS_STAGE;
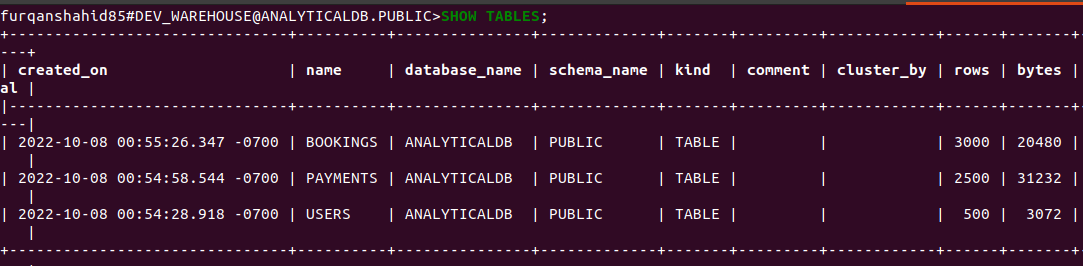
At this point, your database tables look like this:
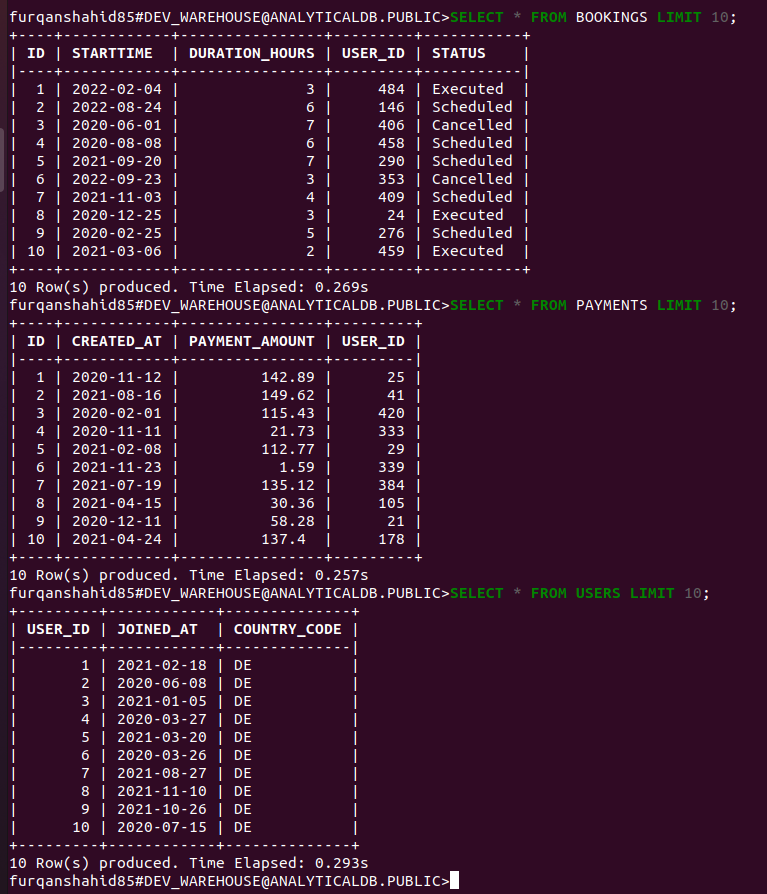
And your table data should look like this:
Solving the "missing column specification" error
Let's look at an example to demonstrate how to resolve this error. In the example, you'll be developing a report to provide insight into the percentage of users, segmented by country, who made their first payment within three days of registration.
The report will be generated by calculating the rank of payments for each user by filtering the data with payment rank = 1 with a difference of <=3 between the date of joining and the date of payment. Finally, the percentage of payments made within three days of registration will be calculated by dividing the total number of users who made payments within three days of registration by the total number of users. The results are stored in the view users_payment_report.
Start by executing the following query from db.sql in the GitHub repo:
create view user_payments_report as (
SELECT
u.country_code,
COUNT(DISTINCT u.user_id) registered_users,
COUNT(DISTINCT t.user_id) first_3_days_payment,
(CAST(COUNT(DISTINCT t.user_id) AS REAL) / count(DISTINCT u.user_id)) * 100
FROM
Users u
LEFT join (
SELECT
u.user_id,
u.joined_at joined_at,
p.created_at created_at,
Rank() OVER (partition by u.user_id ORDER BY p.created_at ASC) as payment_rank
FROM
Users u
JOIN Payments p on u.user_id = p.user_id
WHERE p.created_at >= u.joined_at
)t
ON u.user_id = t.user_id
AND t.created_at - t.joined_at <= 3
AND payment_rank = 1
GROUP BY
u.country_code
);
When you run the above query it returns the error, SQL compilation error: Missing column specification, like so:
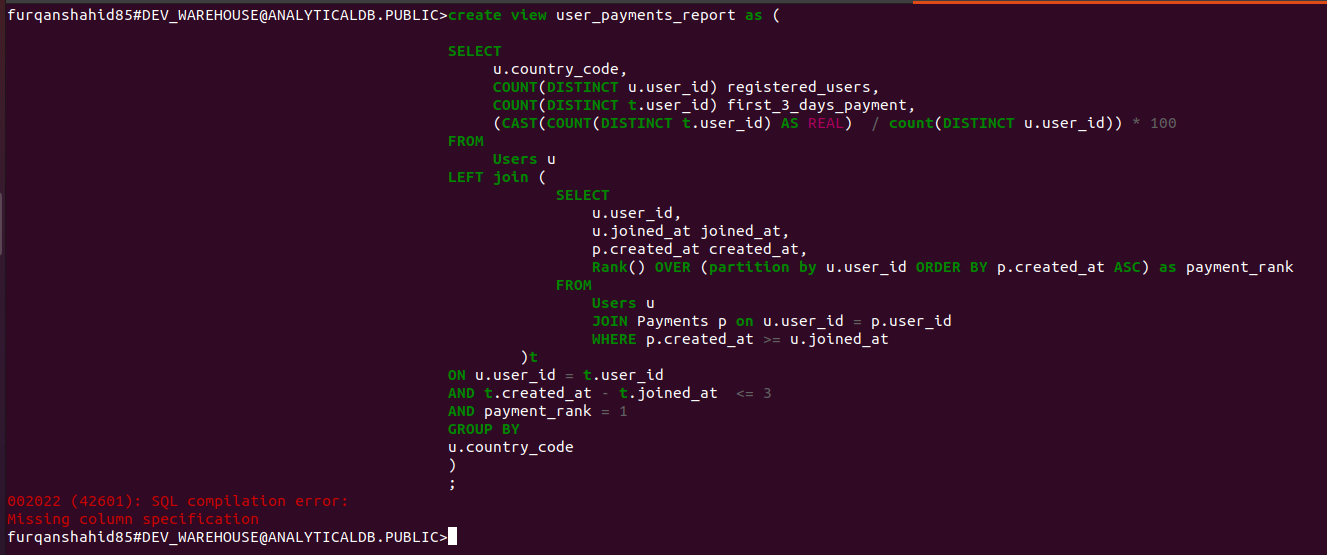
The reason for this error is that when you calculate the percentage of users who made a payment, you did not provide a column alias. Snowflake SQL query syntax requires that whenever you create a table, view, or materialized view using a Select column statement that has calculated fields, such as percentage in this example, you must add an explicit column alias.
Since you didn’t provide a column alias while creating a view from the query results, it triggered a syntax check failure.
-- missing column alias
(CAST(COUNT(DISTINCT t.user_id) AS REAL) / count(DISTINCT u.user_id)) * 100
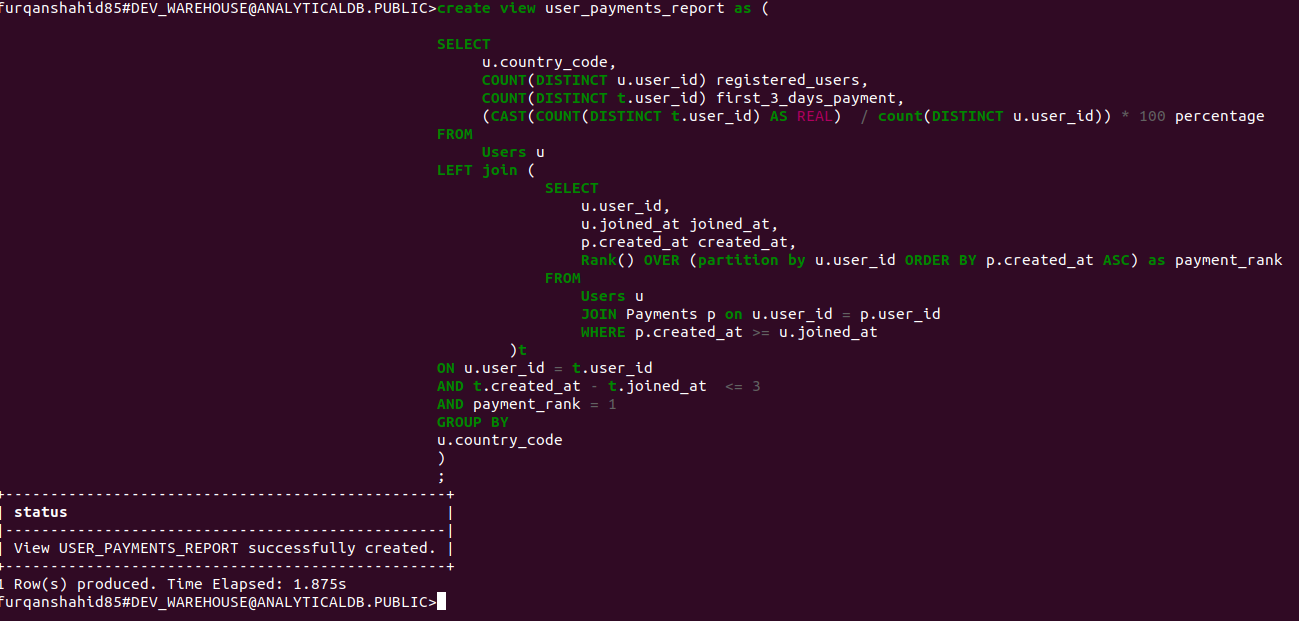
In order to fix the issue, you need to add a column alias for the calculated field, which in this case is percentage:
-- column alias added
(CAST(COUNT(DISTINCT t.user_id) AS REAL) / count(DISTINCT u.user_id)) * 100 percentage
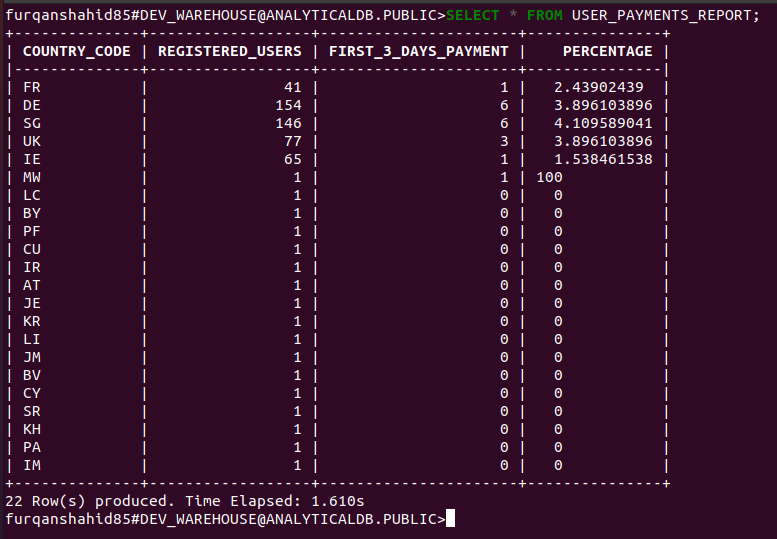
Now, if you run this query again, it executes successfully.
Querying the USER_PAYMENT_REPORT view returns the expected results.
The following scenarios illustrate additional cases in which the "Missing column specification error" will occur, and how to resolve it in each case:
select max(payment_amount) from payments;
--no DDL, no alias, query works
---------------------------------
create table max_payment as (select max(payment_amount) from payments);
-- alias not used, error: missing column specification
create table max_payment as (select max(payment_amount) **as mp** from payments);
-- alias used, works
---------------------------------
create view max_payment_view as (select max(payment_amount) from payments);
-- alias not used, error: missing column specification
create view max_payment_view as (select max(payment_amount) **as mp** from payments);
-- alias used, works
---------------------------------
create materialized view max_payment_view as (select max(payment_amount) from payments);
-- alias not used, error: missing column specification
create materialized view max_payment_view as (select max(payment_amount) **as mp** from payments);
-- alias used, works
Putting your newfound knowledge to use 🧠
In this article, you've learned what causes the "Missing column specification" error in Snowflake SQL. To recap, we've covered how Snowflake SQL syntax is different from competing platforms, how one of the differences is that it requires you to explicitly add column aliases for calculated fields when creating tables or views, and we even included a business case illustrating this issue to see how it's fixed.
Now, as businesses are moving towards being more data-driven, it's more crucial than ever to get data in your central data warehouses operational as soon as possible. This is where tools like Census come into play. 💪 Census provides a comprehensive solution for syncing data between Snowflake and business apps such as Salesforce, Stripe, Mixpanel, and Google Ads (just to name a few).
Because Census is the leading reverse ETL tool available, it allows you to move data from Snowflake into all of your tools without needing to spend time setting up and maintaining these integrations. 😮💨 Instead, you can focus your time and resources on what matters: Getting value from and taking action on your data.
👉 Want to start syncing your data? Book a demo with one of our product specialists to learn how we work for your specific operational analytics needs.