


The concept of multi-tenant (”tenant” meaning user or customer) is the backbone of modern SaaS products. The idea is simple: Rather than each customer having their own dedicated instance of an app, they all use the same instance and only see the data, views, and workflows that apply to them as a customer. Using a single, shared instance, makes running the service much easier to scale, and functionally is the core of the “As-A-Service” part of SaaS.
Multi-tenancy is an easy concept to understand, but implementing it requires a bit more thought and it’s extremely important to get right. Nothing can affect customer confidence in your app than showing details about Customer A to Customer B.
At a high-level, architecting data integrations for multi-tenancy is thinking about when data is “split” from a single repository into individualized repositories for each customer. Or vise versa, when multiple streams are merged together, and how each customers ownership of that data is maintained.
Building integrations with Census Embedded on top of data warehouses gives you a number of complementary approaches for ensuring your customers’ data is siloed, and because they’re complimentary, they can be used in combination to provide strong multi-tenancy guarantees. Census Embedded integrations are usually one of two patterns:
- Activation - Taking data you have and sending it to your customers.
- Ingestion - Getting data from your customers into your application.
Activation
In activation cases, your goal is to take your own data and get it sent to your end users.
Though in some cases you may be activating the same data set to every customer, the most common pattern activation pattern is using Census Embedded to send a customers data to them. For example, this might be a log of activity they’ve generated in your app that they’d like pushed into a marketing tool as events.
To accomplish this, each customer’s integration needs to be configured to split your data repository into the subset of data specific to them. Each integration has multiple resources.
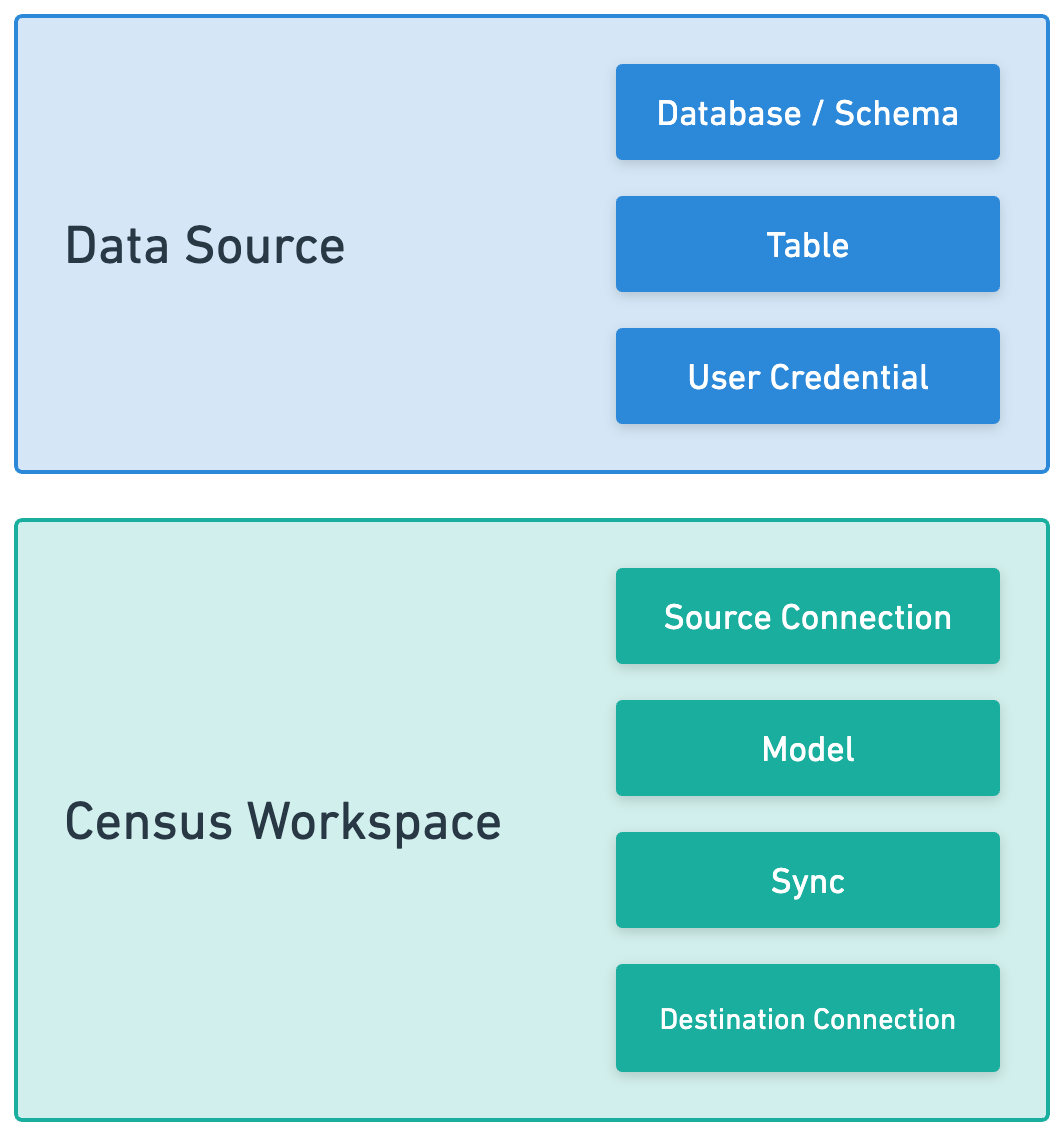 |
In this stack, there’s three places where the split can occur:
- Separate tables/views for each customer in your data source - This is the first potential layer of data isolation. It requires setting up a new database object for each customer when new customers are onboarded. This can be a bit heavy weight, but tools like dbt can provide macros that makes it easy to define N tables once.
- Use row-level security to filter data - Row-level security is an under appreciated capability in most data warehouses. It allows you to dynamically apply a filter to data based on who is querying a table. Use this capability in combination with a per-customer connection credential to filter data automatically to each customer.
- Per-customer Models - This is the easiest step to start with. For each customer, create a model that selects only the data that applies to them before creating a sync configuration.
Splitting higher in the stack requires more duplication of configuration downstream of the split. But the main benefit is that these splits can be used in combination. Maintaining multi-tenant isolation when sending data to your customers is incredibly important. Having multiple layers of enforcement can protect you from headaches if one of these layers were to break.
Ingestion
What about data flowing in the other direction? In this world, you’re using Census Embedded to load data from your customers data sources’ into your product. Maintaining multi-tenancy guarantees are just as important here.
The first step of Ingestion integrations is having a customer provide a connection to their data source. You can have your customer point to a specific table, or optionally have them provide a SQL query and save that as a model.
The next step is loading that data into your app. How your app will receive that data is up to you. You can use one of Census’s existing destinations for data including S3 files, database tables, even webhooks. You can also choose to implement a Custom Destination connector to talk to your API, which also gives you the ability to expose more fine-grained errors.
The architectural decision to be made in this case is thinking about at what point data will be merged, and how it will remain associated to your customers once it is.
- Isolated staging - Load data into separate destinations, for example individual parquet files in S3 that are identified by customer IDs in the file name. These files can then be accessed as external tables using a datalake approach (eg Snowflake will let you query S3 files as “external tables”).
- Merge on load - Load data into a single resource directly. In this case, you’ll need to ensure two things:
- All data being loaded includes a Customer Identifier - You can use a static mapping in a sync configuration to provide this customer ID.
- Loaded data cannot conflict or overwrite - Your integration should treat data as appends. If, for any reason, a unique ID for a record is required, that identifier should also include the customer ID to ensure data from Customer A doesn’t accidentally overwrite data from Customer B.
Either Way, Use Workspaces
Regardless of which integration type you’re building, we recommend you use Census Workspaces for each one of your customers. Using Workspaces provides an isolated space for each customer to ensure that their sources and destinations are not accidentally reused for other customers.
Workspaces require a bit more management work as you’ll need to replicate connections, syncs, and models across each Workspace but this also allows for simple customization for each customer and can save you a lot of pain as well. The Management API makes it easy to create tokens per workspace, and manage user access. And of course, Workspaces are the only way to go if you plan to grant your end users access to the Census UI as well.
Wrapping Up
Hopefully this clarifies how to enforce multi-tenant constraints within Census. As always, if you need a hand getting Census Embedded configured for your environment, don’t hesitate to reach out to our support team at support@getcensus.com.