In this article, you'll learn how to find the right people at the right time and improve Facebook Ads ROI with ML training and Facebook's Conversion API. We'll cover:
- Why you should use the Conversions API to improve your Facebook Ads ROI
- How to configure your Facebook Ads pixel so you can also use the Conversions API
- How to model your data for the Facebook Ads Conversions API
- How to import your conversions into Facebook Ads using a reverse ETL tool
Bad news: If you're only using the Facebook Ads conversion pixel to track the success of your campaigns, you may be spending more than you need on Facebook Ads. Ad blockers and expiration dates on third-party cookies (e.g. via Apple’s ITP) prevent Facebook Ads from learning which types of customers respond best to your ads campaigns.
To help Facebook build the best profile of prospective customers to target, you need to provide it with the most complete training dataset possible. Otherwise, Facebook will waste your budget experimenting on different target audiences until it has sufficient data to begin targeting more effectively.
Good news: The Facebook Ads Conversions API lets you train Facebook faster (and at a lower cost).
The Conversions API, formerly known as the Facebook Server-Side API, allows you to supplement Facebook’s incomplete account of conversions via the pixel, with the data you’ve collected in your systems of record--like orders created, forms submitted to your CRM, or new sign-ups from your database. This API is so powerful that Shopify built out a native integration with Facebook to help their customers optimize their marketing campaigns.
Before we dive into the nitty-gritty, let’s take a look at some usability considerations for this API.
Audience targeting and the Facebook Ads Conversions API
Facebook uses machine learning models to display ads to people who are most likely to engage with your ad campaigns. Before Facebook’s ML targeting, your first and last option lay in manual, fine-grained audience targeting. Not only was this time-intensive, but it often involved a lot more trial and error.
Thankfully, Facebook’s ML targeting outperforms elbow grease methods, instead of learning on our behalf … if it’s given a sufficient signal of conversion events. Facebook requires a sufficiently large amount of conversion events to identify the best-fitting audience for your ad campaign.
If you’re a Shopify eCommerce website, you can take advantage of a native integration to the Conversions API to help ensure that Facebook has the best signal to train on. But what about the rest of us mere mortals without Shopify’s largesse? We’re going to need to integrate with the Conversions API in some other way.
If you’ve ever worked on a team wrestling Facebook’s APIs in the past, you probably have a knee-jerk negative reaction to this method. I don’t blame you. Historically, Facebook’s APIs have been notoriously complicated, confusing, and prone to change. Teams have even gone so far as employing full-time engineers just to troubleshoot Facebook API changes, upgrades, and errors.
And Facebook doesn’t make keeping track of these APIs any easier. Facebook maintains similar-sounding APIs for similar-sounding purposes (e.g. the Facebook Offline Conversions API). While this article discusses the Conversions API, the Offline Conversions API performs a subset of Conversions API functionality, … but is only preferred for tracking physical store sales (and can’t supplement “online conversion events” that you are already tracking with your conversion pixel). If you’re not careful, you may end up building an integration with the wrong API for your goals.
Fortunately, working with Facebook’s APIs has gotten a whole lot easier.
You can now use reverse ETL (extract, transform, and load) tools like Census to take advantage of the Facebook Conversions API, no engineering favors required. Reverse ETL tools remove the headache of building and maintaining your own pipelines, so you can focus on using the data instead of moving it around. Plus, if you have any questions on the behavior of the specific Facebook API you’re working with your vendor can lean on their experience wrestling those APIs first hand to keep you in the loop.
OK, now onto the good stuff. To get the most out of this guide, you’ll need the following:
- A Facebook Ads Account running ad campaigns
- A cloud data warehouse. We recommend Snowflake
- ETL pipelines that load the conversion data from your systems of record into your cloud data warehouse. We recommend Fivetran
- A reverse ETL tool like Census
Let’s dive in.
How to configure your Facebook Ads pixel tracking
To supplement the Facebook Ads training dataset accurately, you’ll need to ensure that you’re not duplicating conversion events that have already been sent via the pixel. By sending certain optional parameters via the pixel, Facebook can use those parameters to de-duplicate data coming from both the pixel and Conversion API.
Specifically, you must explicitly set the pixel event’s event ID so it corresponds to another system’s identifier (e.g. the “order_id” or the “lead_id” in your internal systems), or you must set an external ID value with this type of identifier instead. If you implement the former method, Facebook will use this event ID, alongside the event parameter (the event’s name) to discard all duplicate events. If you implement the latter, then you will only deduplicate conversion events under certain conditions.
Facebook provides guidance on both methods in their documentation here, but the TL;DR is:
- (Recommended) Deduplication based on the pixel’s event ID will ensure events sent via both the pixel and the Conversions API will never be duplicated. Only the first version will be kept, provided that the subsequent browser or pixel event is sent within 48 hours of the first event with the same event ID.
- Deduplication based on an external ID value only works to prevent duplicates caused by events sent first from the pixel and then through the Conversions API. To check on the external ID values sent via your browser pixel, look for the Pixel Helper tool under Advanced Matching Parameters Sent.
After you ensure you're tracking the required parameters for Facebook Ads to deduplicate events sent via the Conversions API, you are ready to start identifying the conversions that you wish to import into Facebook Ads.
How to model your data for the Facebook Ads Conversions API
Next, you’ll need to identify the conversions in your data warehouse that you’d like to send over to Facebook Ads. Using this data, Facebook will supplement its view of success and augment its targeting accordingly.
Facebook Ads will use the data you provide for the following three activities:
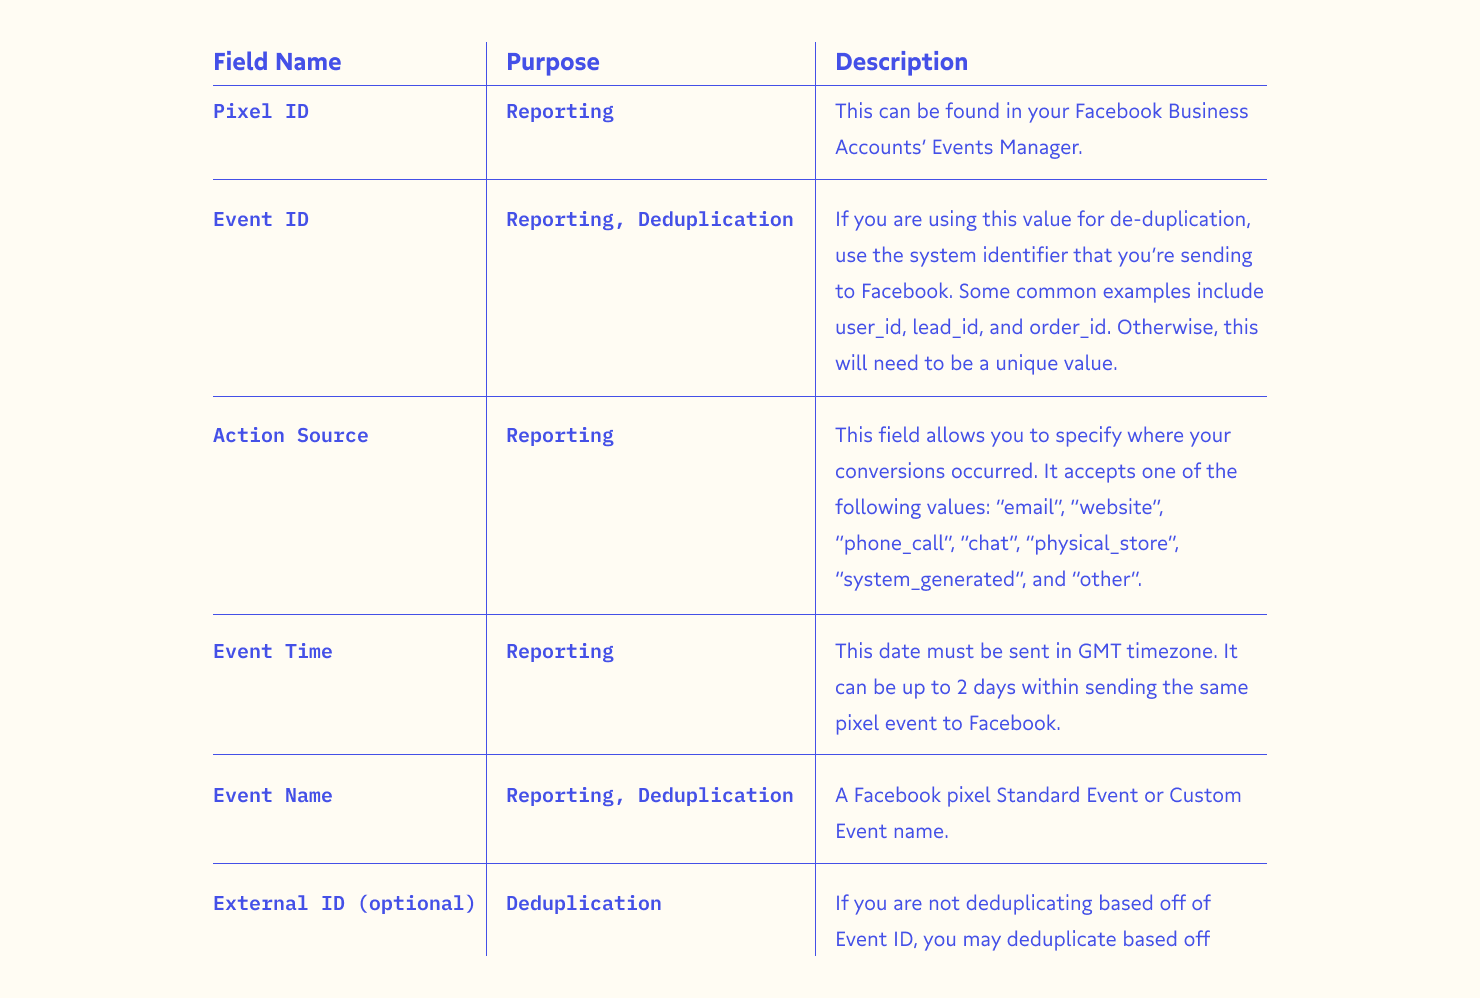
- Reporting correctly. The conversion requires parameters to land correctly in the desired reports, and be counted for the right conversion event at the right time.
- Ads attribution. With the user details provided, Facebook can attempt to make a match to a Facebook users’ ads engagement.
- Deduplication. If sending this conversion data via the pixel as well, Facebook can deduplicate the conversions, provided that the data sent via API is within two days of the pixel tracking the conversion event.
You’ll need the following data in the results of your query:

Your final query will look something like this:
SELECT 1234 AS pixel_id,
	orders.order_id AS event_id,
	'website' AS action_source,
	created_at AS event_time, -- this must be GMT
	'Purchase' AS event_name, -- this must match with the pixel
	customers.email,
	customers.first_name,
	customers.last_name
FROM orders
LEFT JOIN customers ON orders.customer_id = customers.id
And your dataset will look like this:
pixel_id |
event_id |
action_source |
event_time |
event_name |
first_name |
last_name |
|
1234 |
5678 |
website |
2021-01-01 00:00:00 |
Purchase |
john@smith.com |
John |
Smith |
You now have your data to supplement the view Facebook acquired via the conversion pixel. 🎉
How to import your conversions into Facebook Ads using a reverse ETL tool
Finally, you’ll upload this data into Facebook Ads using the Conversions API.
You can certainly build your own integration to the Conversions API, using the Business SDKs that Facebook provides to developers. For regular conversion uploads, production-ready pipelines to Facebook Ads will need to run on a schedule, respect API rate limits, and handle API errors gracefully. Production use cases require logging and alerting to troubleshoot conversions that the API rejects (e.g. when the data doesn’t meet its requirements), and the ability to send those records again after making a fix.
With Census, this step is as simple as taking all of the data you’ve identified from your data warehouse and mapping it to the relevant fields in Facebook Ads. Click “sync”, set the integration to run on a schedule, and your data will be on its way to Facebook regularly. Census will log errors and alert you when the API rejects any conversions you need to investigate.
Harness reverse ETL better train your Facebook Ads campaigns
You can improve the ROI of your ads campaigns by increasing the volume of conversion signals you send to Facebook Ads. Using your own homegrown integration or a tool like Census, you can leverage the Facebook Ads Conversions API to improve the chance that your ads are being shown to the right people at the right time, which means a greater chance of conversion. 🙌
Want to improve your Facebook Ads targeting by supplementing Facebook’s pixel data, or are you curious how to implement this approach at your own company? Please don’t hesitate to book a call with us here to speak more about it. Or, if you’ve found a better way than reverse ETL, I’d love to hear about it.


