


If you’re looking to move your data from Snowflake to Pipedrive, you’ve come to the right place. As you start treating your data warehouse as the hub of your data architecture, you'll start to notice all the new ✨ opportunities ✨ that appear before you.
So – welcome friends! 👋
If you've been around the block a time or two, this might seem obvious, but it’s still true: the hub-and-spoke philosophy is often less complex, more scalable, easier to maintain, and provides the opportunity to operationalize your analytics.
When you bring your data from Snowflake into Pipedrive, you start the journey of operationalizing your analytics and directly improve your business outcomes by:
- Improving your sales pipeline with rich, first-party customer data to help the sales team drive conversions and close new business 🤝
- Personalizing and targeting email campaigns based on Snowflake metrics 🎯
- Creating better continuity across connectors, dashboards, tools, and teams 🔁
The cherry on top? Regardless of your use case, it provides observability into how your organization’s data investment is paying off. 🤑
This article provides a guide to syncing data from Snowflake to Pipedrive, including:
- Manually exporting data from Snowflake
- Unloading into a stage and downloading locally
- Unloading into an external location
- Downloading from Snowflake Worksheet - Manually importing data into Pipedrive
- A fully automated sync using Census reverse ETL (rETL)
What is Snowflake?
Snowflake is an all-in-one platform that encompasses data warehouses, data lakes, and data engineering/data science environments with pay-as-you-use pricing. Amongst all its functionality, it allows users on AWS S3, Microsoft Azure, and Google Cloud platforms to store and analyze data using cloud-based software and hardware. As such, it’s no surprise that it’s grown to be one of the largest data products in the industry.
What is Pipedrive?
Pipedrive is a fast-growing, cloud-based customer relationship management (CRM) tool known for visualizing sales processes in pipelines. It’s an easy-to-use software that allows you to focus on your activities and see measurable results, tracking stages of sales through sets of pipelines and encouraging users to move their sales tasks towards the end.
How to export data from Snowflake
Like Netsuite, there is no native support to connect Pipedrive and Snowflake, requiring both manual data exports from Snowflake and manual data imports in Pipedrive.
1. Unloading into a stage and downloading locally
The first of three methods for exporting data from Snowflake involves unloading data from a table into a stage using the SQL “COPY” command, then downloading the files into your local drive using the “GET” command.
Run the “COPY” command
To unload data into an internal location, you can use the “COPY” command following the syntax below.
COPY INTO { internalStage }
     FROM { [<namespace>.]<table_name> | ( <query> ) }
[ PARTITION BY <expr> ]
[ FILE_FORMAT = ( { FORMAT_NAME = '[<namespace>.]<file_format_name>' |
           TYPE = { CSV | JSON | PARQUET } [ formatTypeOptions ] } ) ]
[ copyOptions ]
[ VALIDATION_MODE = RETURN_ROWS ]
[ HEADER ]
Here, the {internalStage} section has the following rules.
internalStage ::=
    @[<namespace>.]<int_stage_name>[/<path>]
  | @[<namespace>.]%<table_name>[/<path>]
  | @~[/<path>]
Now that you have some basic syntaxes to work with, let’s put them to use!
- Example 1:
- Using gzip compression, the “COPY” command example unloads all data from the budget table into the table’s stage with a simple folder/filename prefix (result/data) and a specified file format (yourformat).
copy into @%budget/result/data_
from budget file_format = (format_name ='yourformat' compression='GZIP');- Example 2:
- Similarly, this command using gzip compression to unload the result of a query into a named internal stage (yourstage) with a simple folder/filename prefix (result/data) and a named file format (yourformat).
copy into @your_stage/result/data_ from (select * from budget)
   file_format=(format_name='yourformat' compression='gzip');
Although these two examples are functionally identical, there is one main difference: the first syntax unloads data into the table’s stage while the second one unloads data into the internal stage. Want to dive into the nitty-gritty details? Check out Snowflake’s helpful documentation.
Run the “GET” command
Once you’ve used the “COPY” command to unload your data, you can use the “GET” command with the following syntax to download the staged files.
GET internalStage file://<path_to_file>/<filename>
    [ PARALLEL = <integer> ]
    [ PATTERN = '<regex_pattern>'' ]
The {internalStage} section follows the same rules as the “COPY” command, so to run the “GET” command, you’ll duplicate the syntax.
internalStage ::=
    @[<namespace>.]<int_stage_name>[/<path>]
  | @[<namespace>.]%<table_name>[/<path>]
  | @~[/<path>]
Although the {internalStage} syntax matches for the “COPY” and “GET” commands, file://<path_to_file>/<filename> may have a different structure depending on your OS.
- For Linux/Mac: include the initial forward slash in the path (e.g. file:///tmp/load).
- For windows: include the drive and backslash in the path (e.g. file://C:\temp\load).
Downloading the files from the table stage into a /tmp/data folder in Linux will look a bit different, though.
get @%budget file:///tmp/data/;2. Unloading into an external location
You can also export data from Snowflake by unloading it to an external location. Before you ask: yes, Snowflake does support exporting to other cloud data storage such as AWS S3, but before you can start using an external export, you have to configure your AWS credential in Snowflake to allow Snowflake to access your S3 bucket.
You have two options here: either use Snowflake integration or provide AWS_KEY_ID and AWS_SECRET_KEY in a “COPY” command. Though this might sound familiar, in this case, the “COPY” command follows the syntax below.
COPY INTO { externalLocation }
     FROM { [<namespace>.]<table_name> | ( <query> ) }
[ PARTITION BY <expr> ]
[ FILE_FORMAT = ( { FORMAT_NAME = '[<namespace>.]<file_format_name>' |
           TYPE = { CSV | JSON | PARQUET } [ formatTypeOptions ] } ) ]
[ copyOptions ]
[ HEADER ]
In the {externalLocation} definition statement, provide your storage integration name (or a pair of AWS Key ID and Secret Key explicitly) like so.
externalLocation (for Amazon S3) ::=
  's3://<bucket>[/<path>]'
  [ { STORAGE_INTEGRATION = <integration_name> } | { CREDENTIALS = ( {  { AWS_KEY_ID = '<string>' AWS_SECRET_KEY = '<string>' [ AWS_TOKEN = '<string>' ] } } ) } ]
  [ ENCRYPTION = ( [ TYPE = 'AWS_CSE' ] [ MASTER_KEY = '<string>' ] |
               [ TYPE = 'AWS_SSE_S3' ] |
               [ TYPE = 'AWS_SSE_KMS' [ KMS_KEY_ID = '<string>' ] ] |
               [ TYPE = NONE ] ) ]
After you export the data, you can then download it from the S3 bucket into your local and sync the data to the Pipedrive API with Python.
3. Download from Snowflake Worksheet
Of course, we had to save the simplest option of exporting Snowflake data for last. If your dataset isn’t very big and you want to export it quickly, downloading your data from a Snowflake Worksheet on your web browser can save you time.
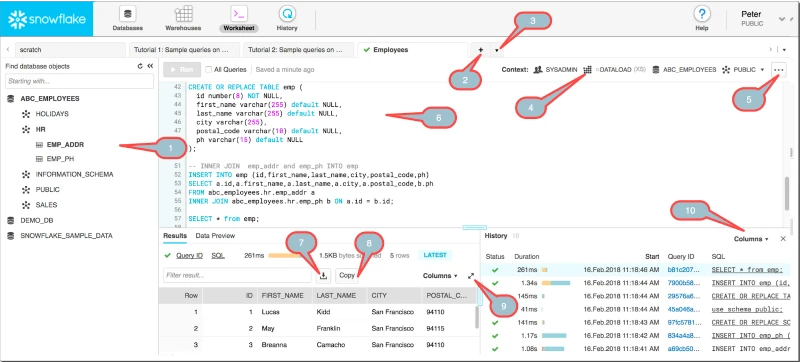
Among the console options above, balloon 7 is what you’re looking for. After executing your query, clicking the icon lets you save the result into your local storage.
How to import data into Pipedrive
Since we now have our data ready, we can import the data (as CSV files) into Pipedrive. To import, follow the steps below.
- Go to "..." (otherwise known as “More”) > Import data > From a spreadsheet.
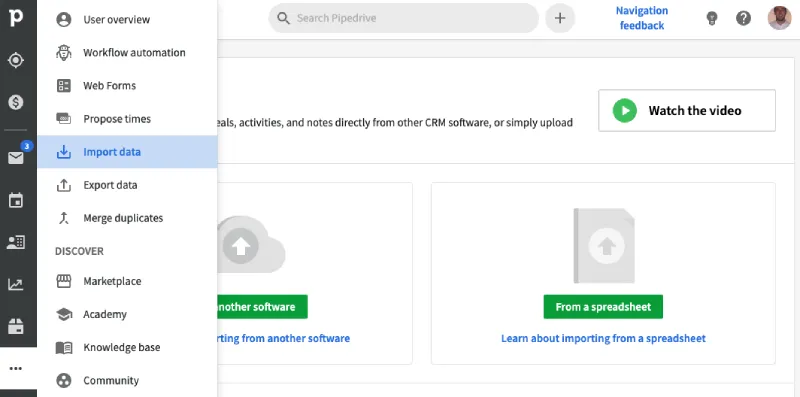
- Select Upload file and locate the file you want to import. Although Pipedrive supports Excel (.xls and .xlsx) *and* .csv files, you can’t export data from Snowflake in an Excel file, so the Excel functionality is probably moot here.
- To properly import your data into Pipedrive, you should map the fields in your file to those in the existing data destination by dragging and dropping the fields on the right side (existing Pipedrive fields) into the Spreadsheet columns (new data fields from your file).
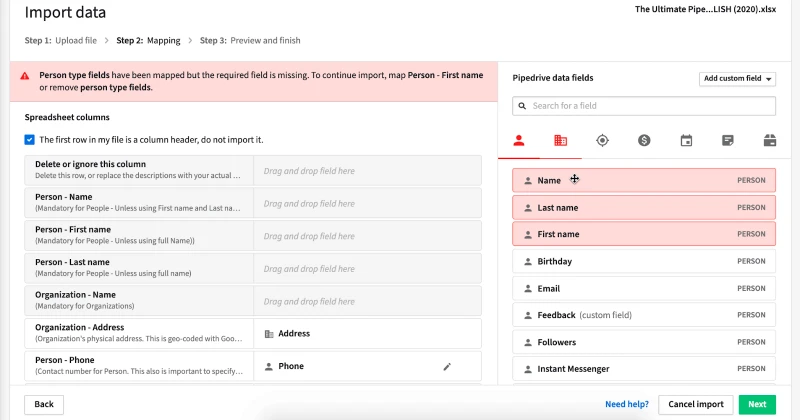
- If your data in the new CSV file does not have fields in Pipedrive, you can add new custom fields there.
- In the next section, you can decide what you want to do if duplicate records are found. You can either merge duplicate records or just add the duplicate rows as separate data.
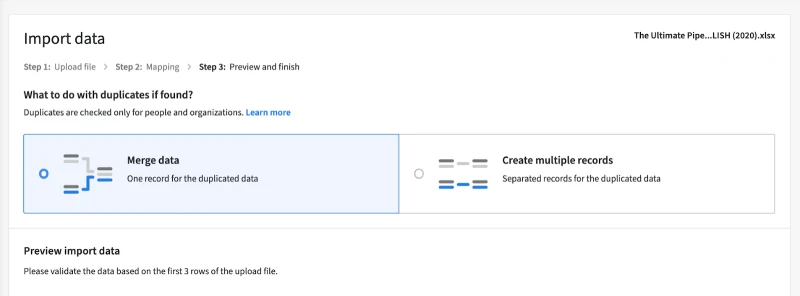
- You can review the mapping once you've done the previous step. After the import is complete, this is how your data will look.
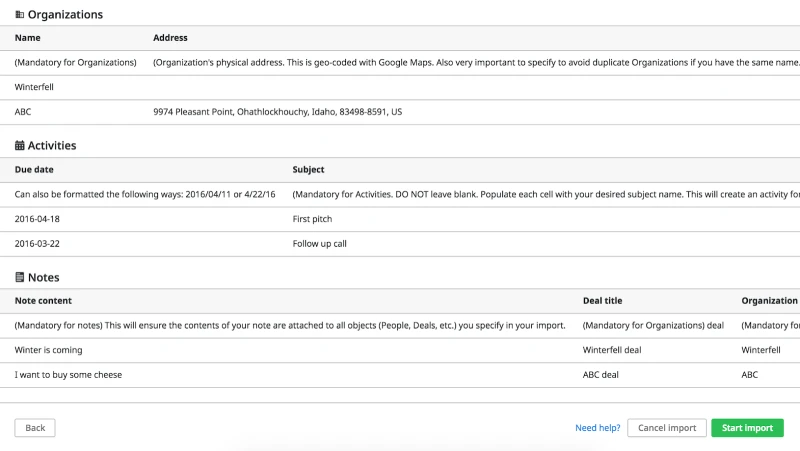
After the import is completed, you will also be able to see a confirmation page that shows the overview of the imported data into your Pipedrive.
When you import CSV files to Pipedrive, there are 2 important things to note:
- Pipedrive won’t accept any special characters (like !,$,^,#) in your dataset, so make sure your records don’t contain any symbols for numeric or monetary fields
- The maximum file size you can upload is 50MB and the maximum number of rows is 50,000
Automate your data sync using Census reverse ETL
Manual steps are such a drag, right? We know – we’ve been there. With that in mind, Census created a way to simplify this process of syncing data from Snowflake to Pipedrive. We love improved data pipelines!
We love them so much that we created a detailed and easy-to-follow, hands-on demo video. Check it out:
Wrapping up
With that, you should be able to sync data from Snowflake to Pipedrive in a snap. Because there’s no native, direct data integration from Pipedrive to Snowflake, you have to manually export data from Snowflake and import it into Pipedrive as an upload or send it to the API with Python.
What a drag… 😒
Because manual exporting and importing can be such a pain, Census created a trustworthy, maintenance-free, and secure way to integrate Snowflake with all your data sources and tools. And yes – it really is an easy, stress-free, and reliable way to sync data from your data warehouse. 🕺
Want to learn more about syncing data between different platforms? Check out our list of “how-to” guides here. Want to start moving your data from Snowflake to Pipedrive for free? Join Census for free!