


Marketing has always been considered more of an art than a science … until recently. As marketing in the modern world becomes increasingly digitized, data science has become an increasingly crucial partner for marketers to help them better understand their customers. With modern technologies and marketing mediums, marketers know more about who their customers are, where their customers are coming from, and why they’re making purchasing decisions.
In particular, we’re going to focus on one of the most popular, digital-era modeling techniques in marketing called attribution modeling.
Attribution modeling lets marketers have a better understanding of the effectiveness of their marketing channels so they can optimize their sales funnels to bring in new sales and improve customer experiences. In this article, we’re going to cover attribution modeling – what it is, why you’d want to use it, and a few pointers on how to get started yourself.
What is attribution modeling?
We use attribution modeling to determine how credit is assigned to each marketing channel, or touchpoint, for a given conversion. In fact, it doesn’t have to be specific to conversions – it can be used to assign credit for each click, each conversion, each email sign up, etc. – but generally speaking, it’s used for conversions.
Why is attribution modeling so useful?
Attribution modeling allows marketers to see which parts of their sales funnel, i.e. touchpoints or marketing channels, were most effective in pushing the prospect to make a sale. This data gives marketers the insight to make better, more-informed decisions about which tactics to pursue and how well a campaign is working.
With attribution modeling, you can learn which marketing channels are the most effective in reaching your customers, ultimately increasing your return-on-investment (ROI) and customer acquisition costs.
Attribution modeling is great for answering the following questions:
- Which marketing channels lead to the most conversions?
- Which marketing channels have the greatest/least impact in the upper-funnel? Mid-funnel? lower-funnel?
- Which marketing channels are the most consistent over time?
Types of attribution modeling, and a general overview
There are several types of attribution models that are commonly used, each with their own pros and cons. To this day, there’s no consensus on which type is the best, and typically, many marketing scientists look at more than one at the same time.
Here are some of the most common types of attribution models:
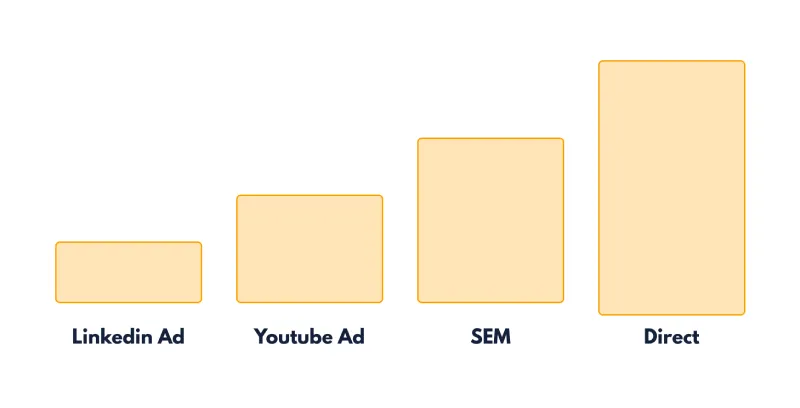
1: First-click model
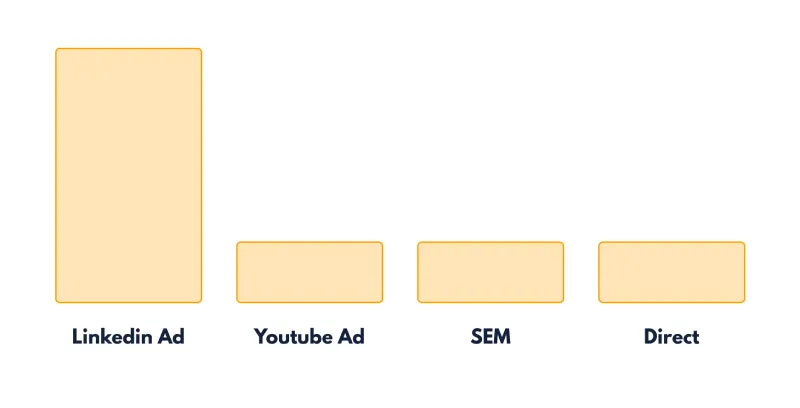
In the first-click model, all the credit – 100% of the value – for the sale is assigned to the first touchpoint, or first click, the customer makes. First click is simple and gives you a good idea of the most effective upper funnel channel, but it doesn’t consider any touchpoints afterward.
2: Last-click model
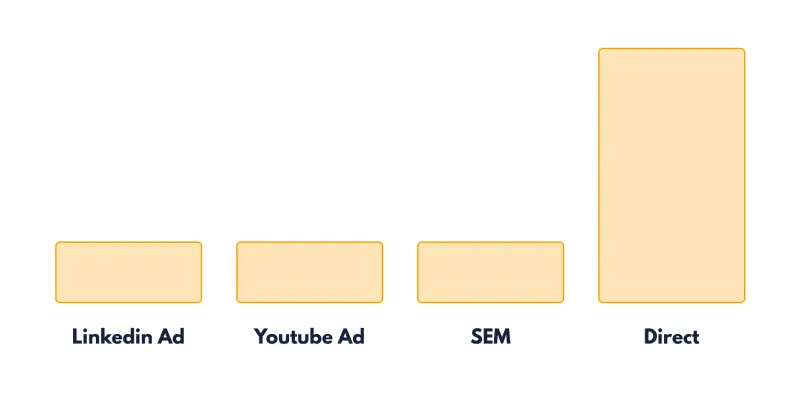
In the last-click model, you assign 100% of the value to the final touchpoint. Last-click is the simplest to implement, to evaluate, and is generally the most accurate. Similar to first-click, however, it doesn’t consider any touchpoints prior to the last touchpoint.
3: Linear attribution model
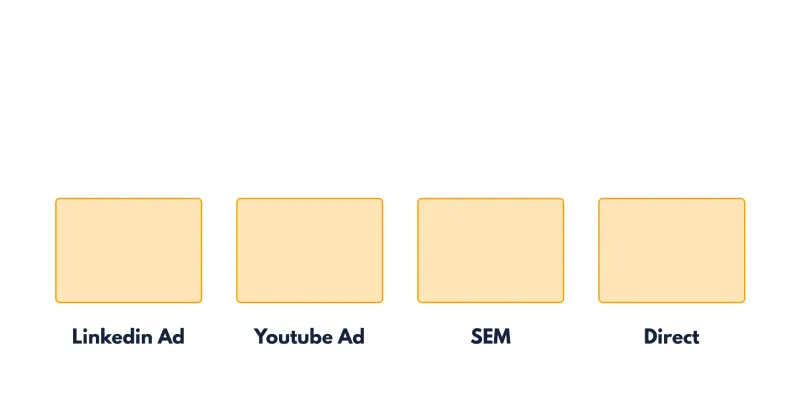
In a linear attribution model, you give credit to each touchpoint equally. Linear attribution gives you a more balanced look at your marketing strategy but it generalizes it in the sense that every touchpoint equally contributes to a conversion, when that’s likely not the case in reality.
4. Last non-direct click attribution model
The name says it all. In this model, credit is given to the last touchpoint that isn’t direct traffic. This is useful because it helps you understand what drove your customer to go directly to the website. For example, if a customer saw a really catchy YouTube ad and later searched it, it would be incredibly useful to know that it was the YouTube ad that drove sales.
5. Time decay attribution model
In a time decay attribution model, the closer the interaction is to the time of conversion, the more value that interaction is assigned. Time Decay Attribution is especially useful for long sales cycles, as it’s likely the case that advertisements from many months ago will have as strong an impact as advertisements seen close to today.
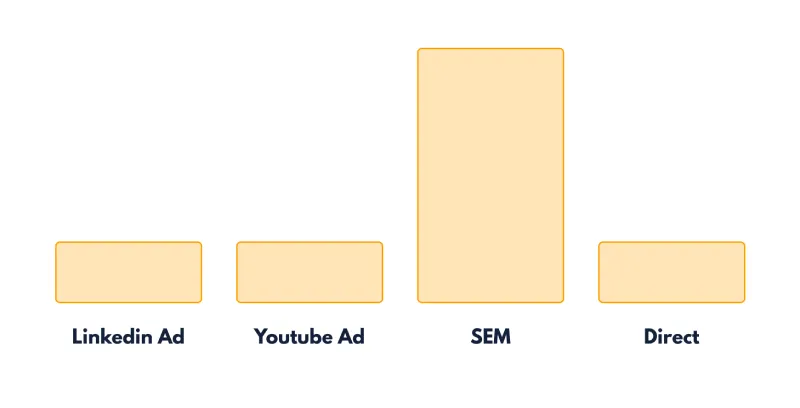
6. Position based attribution model
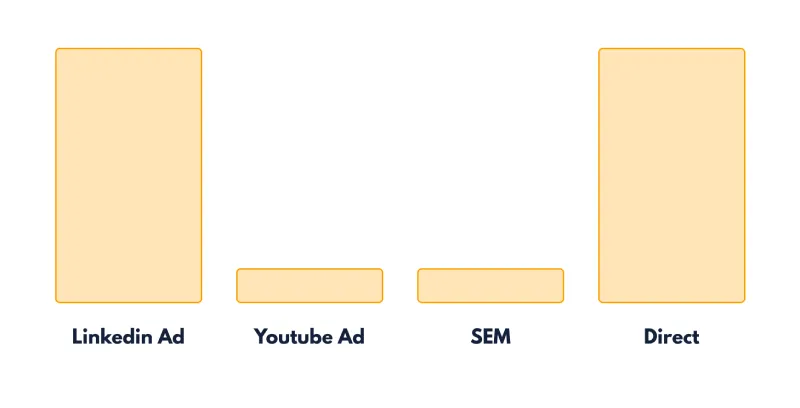
In position-based attribution, 40% of the credit is given to the first and the last touchpoint, while the remaining 20% is spread throughout the rest of the touchpoints in between. Position-based attribution was created with the belief that the first and last touchpoint are ultimately the most important.
Methods to Conduct Attribution modeling
There are a number of ways that you can create an attribute model, each with their own pros and cons. Below are some of the most common methods:
🐍 Do it yourself (in Python!)
Python is used for a lot of data science purposes like attribution modeling. It’s a straightforward language with easy syntax, lots of libraries and global usage. With Python you can pretty much customize your attribution models as much as you like, programming in new functionality, making updates and using any number of libraries and packages to spice it up. This makes it great for long-term technical positions at jobs, or if you’re going to be a particular company’s “go-to” for programming their models to an advanced level.
Still though, the downside is that you’ll need to have data pipelines already set up, and this can be a little tricky for beginners. Python is fun and anyone can learn it, sure, but the learning curve gets steep if you want to go beyond amateur stuff.
If you want to get started with Python, I recommed this great tutorial.
📊Google Analytics
Google’s analytics platform is used by millions of companies. It’s basically an industry-standard in marketing and allows anyone with so much as a page on the internet to measure metrics and touchpoints to see how they’re performing. However, Google Analytics is more targeted towards the actual marketing end and less towards the technical data science end. So, if all you want is to measure metrics and see what you can do to improve, Google Analytics is for you, but if you want to carefully analyze your data and really get a deep understanding of what makes your business tick, it may be better for you to program your own models, or use a platform like Bizible.
🔨3rd party tools
There are tools on the market (such as Bizible) that let you get Marketing Attribution “out of the box” if you plug your event stream (think Segment) into them. They are more powerful than Google Analytics, but a lot less than Python or SQL which allow you to fine-tune your model however you want.
What’s next?
I hope this introduction was useful to understand the core concept of attribution modeling. In our next post on the topic, we will dive into a practical use case of building a marketing attribution model in SQL (maybe even dbt).
In the meantime, if you have questions, or want us to help you build your marketing attribution model, don’t hesitate to contact us.