


Google BigQuery and Slack are both core tools for data folks, so it makes sense that you might want to sync data between them to streamline your daily workflows.
Need a daily morning update on how much revenue your e-commerce site made yesterday? Can do. 👌
Want to be notified immediately if a new lead comes in? You got it. 👍
When you sync data between BigQuery and Slack, the opportunities are endless. So, we're going to show you three different ways of syncing data from BigQuery to Slack (so you can start reaping benefits like these).
The first method we'll show you is manual, in case you just want to sync data once or a handful of times, or if your process changes so often that it makes it hard to automate. For those who prefer to go all out with code and build your own pipeline from scratch, the second method will show you how to automate the process using APIs. Finally, we’ll show you how – using no-code Census automation – you can be notified of any new data or updates to existing data on a regular basis.
Manually syncing data from BigQuery to Slack
Although this is by far the most labor-intensive way to sync your data from A to B, it’s useful if you only need to do so a few times (or your process is actively dynamic). Start by heading over to BigQuery and running a SQL query to get the data that you need. In this case, we're retrieving data from the well-known Austin bike-share dataset. 🚴
SELECT station_id, name, status
FROM bigquery-public-data.austin_bikeshare.bikeshare_stations
WHERE status = 'active'
Once the query finishes running, click on SAVE RESULTS in the lower pane to save the data to a file on your local device – or you can store it on your Google Drive first and then download it from there (if the resulting file is larger than 10 MB and smaller than 1 GB).
If your file is larger than that, don’t stress! 😮💨 There is a way around this imposed limit, but make sure to keep Slack's storage limits in mind if you go this route.
Click on the MORE button above the query pane and select Query settings. Instead of saving the query result to a temporary table, choose to save it to a destination table. Next, choose a dataset and table ID, and run your query. Note: A new table will now be created if you run your query.
From here, click on the newly created table then, from the top row of options, choose EXPORT > Export to GCS. In the new pane, click BROWSE to choose a Google Cloud Storage bucket to store your file to. For the filename, include * as a wildcard (i.e. austin_bikeshare-*). This * will make BigQuery store your data in multiple files if it's too large, but you might want to set Compression to GZIP to reduce file size regardless.
Once you're done, go to Cloud Storage and locate your file(s). Now, they’re ready to be downloaded to your local device. 📥 You can now send these files in Slack like you would any other file. Just drag and drop the file into the message box or click the Attachments & shortcuts button just below it to navigate to your file.
Using APIs to sync data from BigQuery to Slack
If you prefer to reinvent the wheel, you can automate your manual process using APIs. Our tools of choice are the Python BigQuery client library and the Python Slack SDK, though both BigQuery and Slack can be accessed with client libraries for other languages or through their REST API.
Regardless of your tool choice, the first step is making sure that you can access the APIs. Fortunately, Google has written step-by-step instructions to get you ready for your first query.
For Slack, start by creating a new app from scratch. Give your app a name and choose which workspace you want to add it to, then click Create App. On the next screen, under Add features and functionality, choose Permissions and add these four Bot Token Scopes:
Click on Install to Workspace to generate a Bot User OAuth Token starting with xoxb-. You'll need this token in a moment, so store it somewhere until then.
Now, it’s time for the good stuff: Coding. 💻 In addition to BigQuery and Slack, we'll also use pandas to quickly store the data in a CSV format, even though many routes lead to Rome Slack and you can also store your data as for example JSON. Install these libraries first. 👇
pip install google-cloud-bigquery slack_sdk pandasIn your editor of choice, import BigQuery and create a client.
# Import libraries
from google.cloud import bigquery
import pandas as pd
# Create a client
bq_client = bigquery.Client()With that in place, create a SQL query that will retrieve the data you're after. Again, we'll be exporting some data from the famous Austin bike-share dataset.
# Querying a table
sql_query = (""" SELECT station_id, name, status FROM bigquery-public-data.austin_bikeshare.bikeshare_stations WHERE status = 'active' """)We're going to store the data in a CSV file on our local device.
# Storing the data in a pandas DataFrame
df = bq_client.query(sql_query).to_dataframe()
# Saving the DataFrame to a CSV
df.to_csv('austin_bikeshare.csv')With the data ready, it's time to move on to Slack. Remember that Bot User OAuth Token we told you to store, which you definitely didn’t forget about? You'll need it now. Import the Slack SDK and create a client.
# Import library
from slack_sdk import WebClient
# Create a client
token = "xoxb-****************************************************"
slack_client = WebClient(token=token)We'll be sending data to a channel, though you can also send it to an individual via a direct message. To do so, the bot will need to join said channel first, but this only needs to happen once (unless, of course, the bot is removed from the channel, in which case you’ll need to re-add the bot).
# Get a list of channel names and respective IDs
channels = slack_client.conversations_list()
for i in channels.data['channels']:
print(i['id'], i['name'])
# Join a channel
slack_client.conversations_join(channel='channel-id')Now that the bot has joined the necessary channel(s), you can send the data as an attachment along with a message, like so.
# Send a message and file
slack_client.files_upload(
file = 'austin_bikeshare.csv',
channels = ['channel-1-id', 'channel-2-id'],
title = 'austin_bikeshare',
initial_comment = 'Here is the Austin bike share data from BigQuery'
)Sending multiple files in one go is also possible. Although our below formatting is not strictly necessary, it does make for an easier-to-read message within Slack.
# Upload multiple files
urls = []
for i in ['austin_bikeshare', 'austin_crime, 'austin_incidents']:
response = slack_client.files_upload(
file = f'{i}.csv',
title = i
)
# Formatting for readability in Slack
url = response.data['file']['permalink']
url = f'<{url_private}| >'
urls.append(url)
urls = ''.join(urls)
message = 'Here is the Austin data from BigQuery'
# Sending the files
slack_client.chat_postMessage(
channel = 'channel-id',
text = f'{message} {urls}'
)Surprisingly, it’s not currently possible to send the files to multiple channels in one go, but that's something you can fix with a for loop to iterate over the channels.
One more piece of advice on this front: Use the channel ID rather than the channel name when sending messages. Imagine if a few months down the line you try to send data to the channel #bigquery which, in the meantime, has been renamed to #google-bigquery (hint: you'll have a bad time trying to track down a preventable bug).
Connecting BigQuery to Slack through Census
If you’re looking for a better way to send your data from BigQuery to Slack without all the unnecessary heavy-lifting, use Census.
You’ll start by setting up BigQuery and Slack connections in Census. From the Connections screen, click the Add Data Source button and select Google BigQuery. Insert your project ID and the geographical location where its datasets are stored, both of which you'll find in the Google Cloud console.
Click Connect, after which you'll be given a few commands to run in the Google Cloud Shell to finalize the connection. Click Confirm to test the connection. You can check out this video for some helpful tips. 👇
Next, connect Slack by clicking the Add Service button and selecting Slack. Select the workspace that you wish to connect to and click the Allow button. This will open up a Slack window, where you'll need to click Allow once more. Here’s a step-by-step guide to walk you through the process.
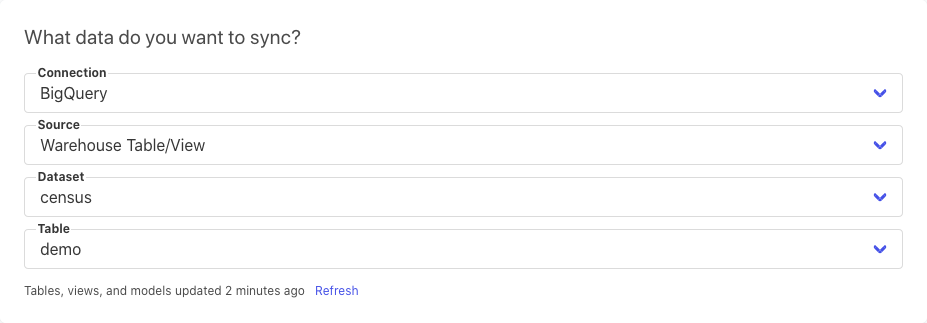
Now that both your source and destination are set up, it’s time to create a new Sync. In the first set of fields, locate the BigQuery table that you want to extract data from.
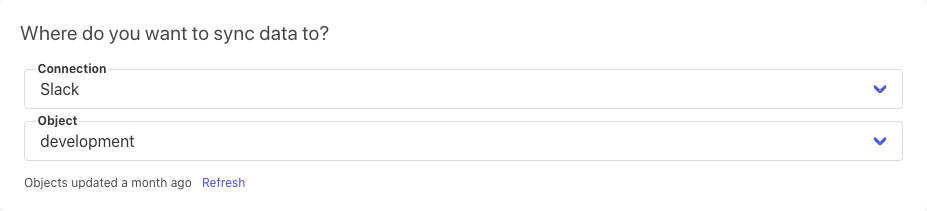
In the second set of fields, choose which channel in Slack to send the data to.
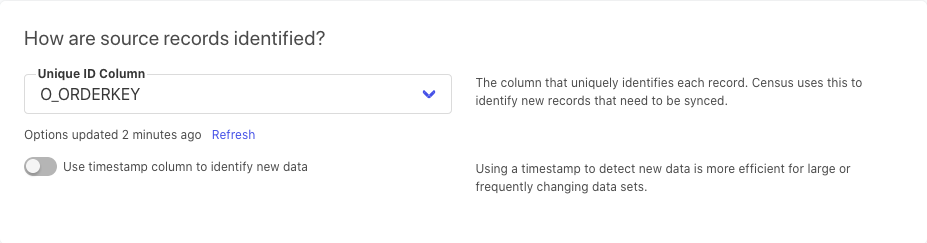
Next, tell Census which column serves as a primary key and also which columns you want to send over to Slack.
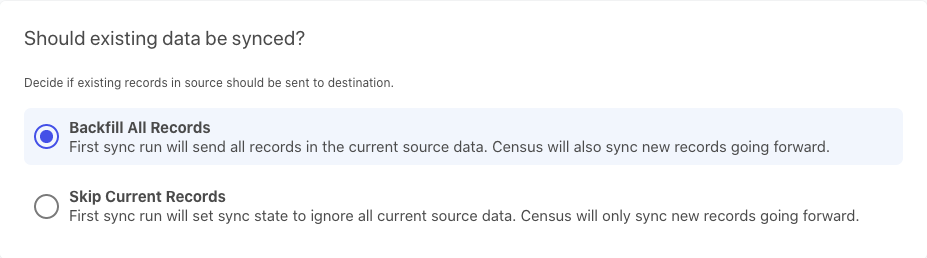
Then, choose whether you want to sync all records within your BigQuery table to Slack, or just the new ones (added from this point forward).
Run a test to verify that everything works as expected and then click Next. Finally, on the overview screen, change the schedule from Manual to whatever schedule suits your needs.
Yep, that's all there is to it. I bet you didn't even break a sweat, but if you do happen to run into any issues, reach out to our support team.
Note: With Census, since you give us a primary key for your dataset, we only ever send new records in your dataset to Slack. If you go the API route and you want to avoid sending your entire dataset to Slack each time you run your Python script, you'll need to come up with your own way of tracking which records have already been sent to Slack (like with a filter to only send records marked with a timestamp after a certain date, etc). Census diffing logic FTW! 🙌
Before you go
If you came here wondering how you can sync your data from BigQuery to Slack, you now have three different methods of syncing at your disposal. No, no, there’s really no need to thank us.
The manual method is the quickest way to get it done if this is a one-off situation because it is so straightforward, but it can be extremely time-consuming if you’ll need to do this more than a few times. When it comes to automating the task with APIs, there’s a bit of work involved during setup. This tutorial we showed is fairly basic, so while the code we showed you is functional, it's only suitable for development purposes. You’ll need loads of other bells and whistles in a production environment, like scheduling, error handling, error logging, figuring out which data has already been synced and which hasn’t, and all those other fun things that come with pushing code to production. 🙄
Your best option for saving time down the line is Census. You can automatically sync your data so you’re notified of any updates on a regular basis. What’s better than that?
✨ Want to start syncing your data? Book a demo with one of our product specialists to learn how we work for your specific operational analytics needs.