


In this article, Michel breaks down how to load data from Snowflake to Airtable using three methods:
- Manual CSV download and upload
- Setting up a semi-automated workflow using the Snowflake and Airtable APIs
- Automating your data syncs with reverse ETL
Low-code platforms like Airtable give everyone across your business the ability to build and customize workflows, collaborate, and power meaningful business outcomes, such as managing and fulfilling new orders.
That is if you can get the data you need from your warehouse into Airtable in the first place.
As you’re probably well aware, Snowflake isn’t the best place to collaborate with your business teams, especially if those business teams aren’t as technical as your data or engineering teams. By loading your warehouse data into Airtable, you open up a gateway to a world where everyone can more easily collaborate with data.
In this article, I’ll break down three ways you can load data from Snowflake to Airtable: The manual (read: less fun) way, a semi-automated way using each tool's respective APIs, and an even easier automated method using reverse ETL.
Let's dive in.

1. The manual way: Export CSV data from Snowflake using SQL
As you can probably guess by the title of this section, this method relies on using SQL in Snowflake to query and download your data locally and manually uploading it to Airtable.
On the pro side, this method is easy and very quick. You can be done in five minutes, making it a great solution for a one-off situation or prototyping before automating. The downside is it involves manual actions and your data in Airtable might go out of sync with your data in Snowflake if you're not constantly rerunning this manual sync.
To get started, head on over to the Snowflake web interface so you can run your SQL queries. We’ll set up a query to select the data we want to export to Airtable using the sample dataset and query below.
SELECT C_CUSTOMER_ID, C_FIRST_NAME, C_LAST_NAME, C_EMAIL_ADDRESS
FROM "SNOWFLAKE_SAMPLE_DATA"."TPCDS_SF100TCL"."CUSTOMER"
LIMIT 2000;
Note: You’ll need to make sure the dataset you end up with falls within your Airtable plan limits.
Once your query finishes running you'll see your data in the Results pane. Here you'll find a button to download your data as a CSV file. However, if your query result exceeds 100 MB and you are using the classic UI, you won't be able to download it. To get around this, use the newer Snowsight instead, which doesn't have a maximum file size limit.
Once your download is complete, go to Airtable and click the base that you want to add this data to. From the top menu, choose Add or import > CSV File and choose to add the data to a new or existing table, depending on where you want it to live.
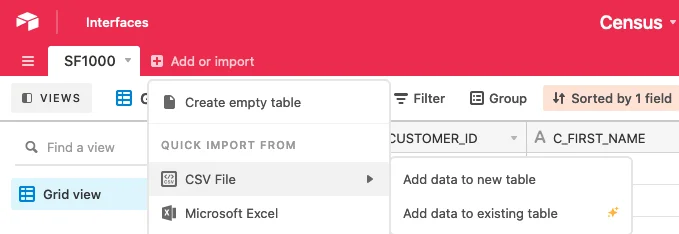
If you're creating a new table from your data, Airtable will show you a preview of your data, along with the data types it thinks your columns are. While it does a decent job in recognizing the data types, it's best to manually verify them to ensure the best data quality.
If you're in a rush though (or just feeling plain lazy, no judgment) you can always edit these later. Once you hit save, it’ll take you to your newly built table.
Note: Airtable will give you a warning if your data contains missing values (but you’ll have to do a bit of guesswork as it doesn’t provide any further detail). If you want to inspect the missing data, you can sort columns from A - Z so the missing data is shown first. Alternatively, apply a filter to only show data where a particular column is empty.
If, instead of creating a new table, you're uploading to an existing table, Airtable will show you a different set of options, including:
- Which table to add the CSV data to.
- Whether to merge the CSV data to existing table records based on a unique identifier or to append it.
- Whether the CSV file contains headers, to which the answer in the majority of cases will be yes.
- Whether you want to create missing select options.
- Field mappings (e.g. which column in the CSV matches which column in the table data). Airtable will automatically recognize and pair columns with matching names.
Once you’ve configured these options to your liking, hit save and you’re done. 🙌
2. The automated way: Create an automated sync using Snowflake and Airtable APIs
Both Snowflake and Airtable have excellent APIs that you can work with to create an automated pipeline so your Airtable data stays up to date. My language of choice is Python, so I'll show you how to use the Snowflake Python connector and the community-built pyairtable, though there are plenty of other options if you're not a Python fan, such as Node.js.
If you haven't already, start by installing the libraries and then importing them.
pip install snowflake-connector-python pyairtable
from pyairtable import Table
import snowflake.connector
We’ll first tackle getting the data from Snowflake. Create a Connection object, as seen in the code sample below, using your credentials. If you normally use the Snowflake classic web UI, you’ll find your account in the URL after logging in: https://<your-account>.snowflakecomputing.com.
conn = snowflake.connector.connect(
    user = 'your-username',
    password = 'your-password',
    account = 'your-account'
    )
You're now all set to query your data using SQL in Python. We'll query four columns from our sample data. Notice that we're limiting our results to 1,000 rows so we can get a sense of our resulting dataset without having to wait a long time for the query to run (unless you're looking for an excuse to take a coffee break, then more power to you).
cursor = conn.cursor().execute(""" SELECT C_CUSTOMER_ID, C_FIRST_NAME, C_LAST_NAME, C_EMAIL_ADDRESS FROM "SNOWFLAKE_SAMPLE_DATA"."TPCDS_SF100TCL"."CUSTOMER" LIMIT 1000; """)Our cursor now contains the data itself as a list of tuples, as well as the names of the columns as a list.
data = cursor.fetchall()
columns = [i[0] for i in cursor.description]
Go ahead and examine these. If this is the data you expected, query the data again, this time removing the LIMIT clause (and go grab that coffee). Once you're done querying, close the connection with Snowflake.
conn.close()Note: Airtable only accepts a list of JSON objects, so we’ll have to format the data to match that. To do so, so we’ll use the following code:
records = []

for datapoint in data:
   record = {}

   for idx, column in enumerate(columns):
       record[column] = datapoint[idx]
records.append(record)
Sweet - we're done with Snowflake now; on to Airtable. Blink and you’ll miss this part (it’s pretty smooth). Start by importing Table from pyairtable.
from pyairtable import TableYou'll need three things next:
- Your API key (you can find it here)
- The Airtable base you want to write your data to (grab the ID from the URL: https://airtable.com/<base-id>/<rest-of-url>).
- The name of the table you're about to write data to. (Note: If the table doesn't exist yet, create it. This unfortunately is the only part that you cannot do through the API.)
For the sake of data quality, consider uploading the first few rows of your file manually and then deleting all the rows in the table. This will ensure that you have all the right columns in Airtable. Then, upload your data in full with the following code.
table = Table('api-key', 'base-id', 'table-name')
table.batch_create(records)
Done. If you were successful, you’ll get a list of the records you just uploaded. See - that wasn’t that bad! Aside from having to manually create a table. 😅
Updating a record with your data: For whatever reason, it's more difficult to update a record. You need to get the ID of a record from Airtable — which is not the same as your primary key column. To get the ID, you can use all to retrieve (as the name implies) all your records, store the IDs of the ones you want to update, and then use batch_update. Make sure to take note of the replace argument.
3. Do more with your data (and time) with reverse ETL
Congrats! If you made it this far into the article, I’m guessing you’ve successfully synced your Snowflake data to Airtable using one of the above solutions.
However, if you’re like most data folks, this probably isn’t the last time you’ll have to do this sync (or Google how to do the sync). If you want a more permanent, automated solution so you never have to think about manually loading data from A to B, check out reverse ETL.
While Snowflake and Airtable have pretty easy-to-use APIs for this use case, no one wants to spend their time manually downloading or uploading CSVs, checking to make sure fields are mapped correctly, or ensuring Airtable detected your field types correctly. Reverse ETL can help with this by giving you a way to automatically pull fresh data from your warehouse, whether you’re creating a new table or updating an existing one. Plus, with a reverse ETL tool like Census, you don’t have to spend your days worrying about API rate limits and hitting 429 error codes for accidentally maxing out that rate limit.
You can check out how to sync Snowflake to Airtable via Census in the demo video below:
Sounds pretty sweet, huh? If you’re looking for a way to speed up your data workflows (and spend less time doing boring sync work), give Census a spin (and sync yourself some swag to see how it works).